Moved to scissorspaperwok.com
Showing posts with label diy. Show all posts

Wednesday, 16 March 2011

Button Template Now Available!


For those that have been long time followers, you would probably know that my tutorial on how to make your own personalised buttons from shrink paper has been one of my most popular.

Every now and then I'll receive an email from someone that would love to have the template that I use in the tutorial - which I've only been too happy to email.

But, as life would have it, I become more tech savvy and hey presto, I can now provide you with a link to instantly download the template.

CLICK HERE if you would like to download the template. Once the image downloads to your web browser, just right click and save the image.

FREE button template

Tuesday, 6 July 2010

Our Green Thumbs...

If you've been wondering where I've been lately... chances are you might find me with my hubby in our backyard (or eating the produce of it!)

Here's a photo tour of our first ever vegetable garden!

It may look like a sorry sight now, but trust me it gets better. In the top right are chives, underneath is mint, and you're probably wondering what on earth is that blue sheet? Well, it's a lettuce roll! Doesn't look like much there, but keep on scrolling, we can't eat enough to keep it down!


Lettuce starting to push through!!

Still babies...


WOO HOO!! Check it out! 

Taking a decent portion of lettuce like this hardly makes
a dent in our patch.. we haven't had to buy lettuce for
weeks! 


Broccoli! My neighbour warned me of moths that love to
nest in broccoli and would lay its eggs on the underside
of the leaves. So the cardboard around the base is meant to
prevent the moths laying. They didn't stop them all, but
 apparently mine look great compared to others. Still some
 caterpillars but found them early on. 


Voila! That's my broccoli! It makes me so
happy to be able to eat form my own garden!
Yes, they are planted way too close, but
I didn't know any better. 

Runner Beans. We're still waiting produce,
but there are 2 beans! 

Our sugar snap peas have grown almost to the
top of the stakes and producing lots of beans.

Baby red capsicum (peppers). You can see the beginnings
of another in the white flower! 

Picking beans for my lunch!

So what do you think? I'm so pleased with the outcome. I use to think you had to have some sort of great talent to grow vegetables, but now I know it doesn't take much, just some TLC when needed.


Wednesday, 31 March 2010

Edible Spoons and Bread Soup Bowl - Tutorial

Edible Soup Spoons and Bowl...

After recently discovering that I am indeed capable of making bread, in true style, I've tried to be as creative as I can! But, to be fair, "edible bread spoons" was my husband's idea. I'm sure I'm not the first to make these, but I dare not look (as I had a lot of fun making these up myself).


1. First you'll Need some dough. I decided to make a dough without yeast so that it was easier to make a flat spoon shape.

Ingredients: 325g flour, 1tbs salt, 1/2 tbs sugar, 200ml of warm water.

To make the dough: mix all the dry ingredients together, then add water and kneed with hands. Once you have a nice consistency, you're ready to go!

Prepare the work surface with flour

Dust Bowl with Flour

After rolling dough flat lay over bowl,
press into the blow shape, and cut off
excess dough around the edges.

Now that your bowl is ready, time to make the spoons!
Using a regular spoon, press top of
spoon into dough as shown,
then using the end of the spoon
do the same. (Try to get them
roughly the same size)


Using a knife draw lines from the
top curve to the bottom to
complete the spoon shape.


Next, align spoons in a (well I don't know what you call this tray???)... I don't even know what you would use it for? My neighbour gave a whole bunch to me a while ago. Can anyone shed any light?


Press the bowl of the spoon into the tray bowls.

Bake in Oven!!!

I baked mine in the oven for around 35 minutes at 195C (380F). Keep an eye on them, as cooking time will vary from each person.

Edible Bread Bowl and Spoon!


Filled with homemade Broccoli soup!
Verdict: My husband and I really enjoyed dinner tonight! It was cool to be eating from bread spoons - in fact, we didn't even use normal cutlery at all! The spoons were really crunchy, but still enjoyable.

Fancy a completely edible meal??

Monday, 22 March 2010

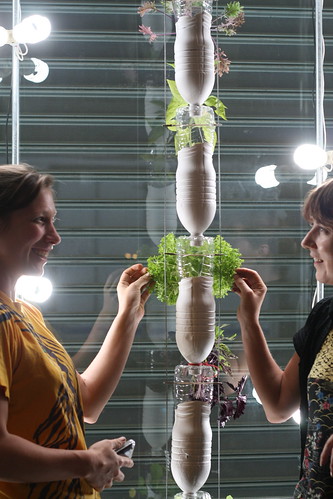
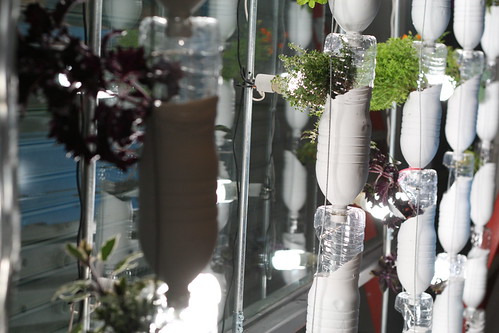
Oh! Window Farms! Now, that's what I like to see!


During my daily affair with StumbleUpon, I stumbled across windowfarms.org. Window Farms promote a fantastic DIY project. But in actual fact, Window Farms, has been termed a R-DIY project; for

Research, and Develop it Yourself.


The whole aim is to see fresh produce growing in your own home.

On a recent flight overseas, I watched a documentary on the manufacturing of food which actually made me feel so sick I had to turn it off (as, that plus flying was not a good combination for my stomach.) Although I don't remember all the scientific terms, and repercussions some of everyday food is making, one thing that stood out with neon lights is; it's not about my body, not about my health or well-being, these big food corporates exists to make MONEY!!! (Well duh, I just never dwelled on the thought before)

We're a means to an ends! And that ends has no positive impact for me.

So, point being, by growing your own food, YOU know what's in it. You know that it hasn't been genetically modified (buy organic). You can start to be in control of what you eat - yes, even if you live in a apartment where you don't even own in inch of soil.

Window Farms has an online community of people that are passionate about the dream of growing your own food in urban areas. You can join, learn and contribute tips and tricks that you have learned while making your own Window Farm.

Join the growth: our.windowfarms.org

Oh, and one of the best things about this R-DIY, is that you're recycling plastic bottles, with bits and pieces from your hardware store! Leaving you free of a gimmicky piece of equipment that you need to buy!

Are you as keen as I am!?


Monday, 20 July 2009

How to Make Your own Personlised Clothing Buttons from Shrink Plastic - A Nifty DIY Tutorial!


To check out the easy step-by-step tutorial to create these awesome buttons, please head over to my new blog: www.scissorspaperwok.com


Tuesday, 14 July 2009

How to make a crafty HOT plate??? Tutorial


So I had this idea to make flat marbles into a hot plate.. But Mark (my beloved) said that he thought someone had already done that! I dared not look!! So to me, this is as original as can be :P

Here we go..

Materials...


  • A base for your hot plate. I used a rectangular piece of wood. (I would have used a circular shape if I had one.)
  • Paper and Pens. I decided to draw my own designs. You can of course use paper with a pattern on it ready for you to cut.
  • A circle hole punch the size of the flat base of the marbles. Or scissors will do the job.
  • Glue. Use a silicon based glue, as this is great for using on glass.
  • Flat Glass Marble. I used 48. (I also unintentionally ordered clear glass marbles that have an iridescent look to them. This wasn't my plan, but it kind of looks good anyway - so just make sure you get what you want)
1. Prepare the Paper Circles...


If you decide to draw your designs, make sure you make a few extra for mistakes you might make.


I decided to do a Paris love theme.. about a year ago, my husband proposed to me in Paris on the Arch de Triumph.. oh sweet memories!

2. Glue the paper circles to the marbles...


I experimented with a few different ways for the gluing process, and found it was easier to put a dab of glue on the paper and press the marble down on top. This way you can see where the glue is spreading and push the glue where it needs to go.

3. Prepare the Base...


You don't have to paint the base, but I thought a red would compliment the red highlights I made in my images.

Once the paint has dried, simply glue the marbles in place!!

And...

Voila!!


Alternatives...


(obviously hadn't put the marbles on yet!)


This was made using small wooden buttons. I actually really like this one! And over time you might get nice brown burn marks on the tops of the buttons for a loving used effect.

So there we have it!
Try it yourself. It's a great craft to do with a friend, and one that you will be able to use most days!

Thanks for checking out this blog!!
(Let me know if you like this kind of thing??)

Kimanh xo


Thursday, 2 July 2009

How To... Very Cute Toadstool Pencil Craft


To view this easy step-by-step tutorial, head over to my new blog to see this post! 


www.scissorspaperwok.com